Rejuvenating a garden fork
Here are a few photos showing the steps I went through to create a new handle.
 |
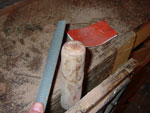
I started with a knot free piece of semi-dry kanuka branch shown here with the bark still on. |
 |
This was then cut to length and stripped down to be an appropriate size |
 |
Using a rasp and sand paper I shaped the short section of handle, smoothing off the irregularities. |
 |
This shows the fork head before any cleaning. |
 |
Using the drill press and a hole saw to cut out a section for the vertical handle to fit into. Be careful not to cut all the way but to allow the pilot drill to go all the way through to allow for screwing back through as shown in the next picture. |
 |
As the drill saw does not cut all the way through you must chisel out the circular piece of wood that would normally be punched out if the drill saw cut all the way through. |
 |
A few steps were missed here but as you can see the vertical handle (made of hawthorn) was shaped and fitted to the fork and then the short piece screwed and glued onto the top. |