An Introduction - What is Grafting?
Welcome to the exciting world of plant grafting, a clever technique that’s been used for thousands of years to create amazing fruit trees. Grafting is like playing matchmaker with plants: you join two parts from different plants to make one fantastic new tree. The scion is the top part, which gives you the fruit or flowers you love, like juicy apples or colourful roses. The rootstock is the bottom part, with strong roots to keep the tree healthy and growing well. When they’re joined, they work together as one happy plant!
Grafting is a brilliant skill for home orchardists. It lets you grow your favourite fruits, make trees stronger, or even create a single tree with different kinds of fruit—imagine picking apples and pears from the same tree! It’s perfect for fruit trees, roses, and even shrubs, making it a must-know for anyone with a backyard in New Zealand.
I’m a hobby gardener in North Canterbury, and I love grafting fruit and nut trees in my forest garden. Sometimes I graft onto special rootstocks near the ground, but I also enjoy adding new varieties to older trees to get a mix of flavours on one trunk. It’s like creating a fruit salad tree right in my backyard, and I’m thrilled to show you how to try it in your own garden!
Why Learn Grafting?
- Lets you grow exactly the fruit varieties you love.
- Saves space by combining multiple fruits on one tree.
- Helps trees grow better in New Zealand’s soils and climate.
- Makes it fun to experiment and create unique trees!
Grafting Through the Ages - A Quick History
Hey, plant lovers! Let’s hop in a time machine and explore the cool history of fruit tree grafting—a trick that’s been helping gardeners grow awesome fruit for thousands of years. Here’s the story in a nutshell:
- Ancient Beginnings (Around 2000 BCE): Grafting started in places like Mesopotamia and Egypt, where clever gardeners figured out how to join plants to grow better fruit. They were like the first plant scientists, experimenting to get tastier crops!
- Spreading the Knowledge: Grafting tricks spread to ancient Greece and Rome. Writers like Theophrastus and Pliny the Elder shared their tips in books, like the gardening blogs of their day, teaching others how to mix and match plants.
- Middle Ages: In Europe, monks in monastery gardens kept grafting alive. They used it to grow lots of fruit varieties, helping orchards thrive across the land.
- Renaissance and Exploration: During the Renaissance, grafting got even fancier. Explorers took fruit trees to new places, like New Zealand, and grafting helped spread exciting varieties around the world.
- Science Boost (1700s–1800s): Scientists learned more about how plants work, making grafting techniques better. This helped farmers grow stronger, more productive fruit trees.
- Modern Grafting: In the 20th century, grafting became a superstar with new rootstocks and clever methods. These made trees healthier, more disease-resistant, and perfect for small gardens.
- Today in New Zealand: Grafting is still a go-to skill for Kiwi gardeners. Whether you’re growing apples in Canterbury or citrus in Auckland, grafting helps you create trees that suit your backyard. Methods like whip grafting, cleft grafting, and bud grafting are easy to learn and fun to try!
Grafting has been a game-changer for fruit trees forever, and now you can join this awesome tradition in your own New Zealand garden!
Key Terms to Know
Before we dive into grafting, let’s learn some simple words you’ll see a lot:
- Scion: The top part of the graft, usually a small branch or bud, that gives you the fruit or flowers you want. For example, a cutting from an ‘Gala’ apple tree.
- Rootstock: The bottom part with the roots, which keeps the tree healthy and controls its size or strength. Think of it as the tree’s foundation.
- Cambium: A thin, green layer under the bark where the magic happens. This layer must touch between the scion and rootstock for the graft to work, as it grows new tissue to join them.
- Interstock: A middle piece used when the scion and rootstock don’t get along. For example, some pears don’t like quince rootstocks, so an interstock bridges the gap.
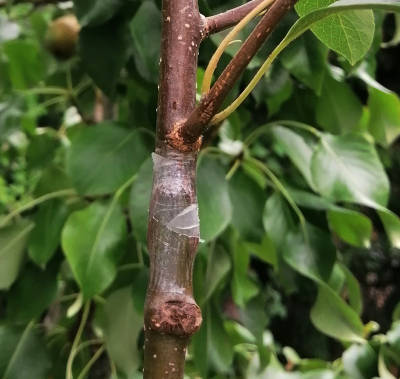
- Graft Union: The spot where the scion and rootstock join and heal together.
These terms will pop up as you graft, so keep them in mind as your plant vocabulary grows!
Tools and Materials for Grafting
To start grafting in your home orchard, you’ll need a few simple tools and materials. Don’t worry—you don’t need fancy gear, and many items are budget-friendly!
- Sharp Grafting Knife: A small, super-sharp knife for making clean cuts. A good pocketknife works too, as long as it’s sharp.
- Pruning Shears: For cutting scion wood or trimming rootstocks. Look for ones that make clean cuts without crushing the wood.
- Grafting Tape or Parafilm: This wraps the graft to keep it tight and moist. Buddy Tape is awesome because it’s perforated like toilet paper and breaks down naturally, so it won’t choke your tree. Coloured electrical tape is a cheap alternative—its bright colours make it easy to spot grafts later.
- Grafting Wax or Sealant: Seals the graft to keep out water and germs. You can find this at garden centres or online.
- Sterilising Solution: Rubbing alcohol or a 10% bleach solution to clean your tools and prevent spreading diseases.
- Labels: Small tags or tape to mark your grafts with the variety and date. This helps you remember what you grafted!
- Healthy Scion and Rootstock: Choose disease-free scion wood and compatible rootstocks (more on this later).
Why Graft? Pros and Cons
Grafting is a fantastic way to make your home orchard amazing, but it has upsides and downsides. Here’s a quick look to help you decide if it’s right for you.
Benefits
- Grow Your Favourites: Grafting lets you copy exact fruit varieties, like your neighbour’s delicious ‘Granny Smith’ apple, so you know what you’ll get—tasty fruit every time!
- Control Tree Size: Choose a rootstock to make your tree dwarf (small, about 2–3 m), semi-dwarf (4–5 m), or standard (6 m+). Dwarf trees are perfect for small New Zealand backyards.
- Stronger Trees: Some rootstocks resist diseases or handle tough soils, like the clay in parts of Canterbury, keeping your trees healthy.
- Faster Fruit: Grafted trees often fruit in 2–4 years, much quicker than trees grown from seeds.
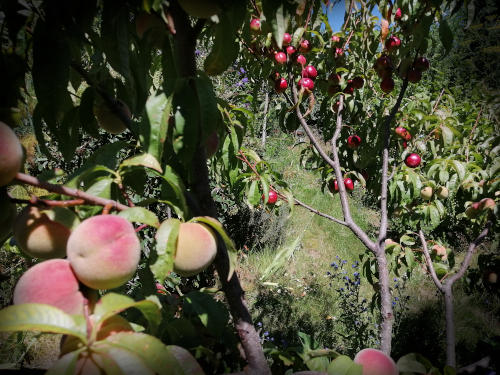
- Space Savers: Graft multiple varieties onto one tree to grow different fruits in a small space—perfect for urban gardens!
- Fix Damaged Trees: Use grafting to repair broken branches or revive old trees in your orchard.
- Save Rare Varieties: Grafting keeps heirloom or rare fruits alive, like old New Zealand apple varieties.
Downsides and Considerations
- Less Variety in Genes: Grafted trees are clones, so they’re all the same genetically. This means less diversity compared to seed-grown trees.
- Weak Spots: The graft union can be fragile for the first few years and might break under heavy fruit or wind (common in windy New Zealand!).
- Disease Risk: If your scion or rootstock isn’t clean, you could spread plant diseases.
- Shorter Life: Some grafted trees don’t live as long as seed-grown ones, especially if the rootstock and scion aren’t a perfect match.
- Tricky Maintenance: Multi-grafted trees can be hard to prune if different parts grow at different speeds, which can happen in New Zealand’s variable climate.
Tip: Start small with one or two grafts to get the hang of it before trying a multi-variety tree!
Where to Start – Learning the Art of Grafting
Ready to graft your first tree? It’s easier than you think, especially if you start simple. Here’s how to begin in your New Zealand backyard:
- Practice First: Try grafting on cheap plants, like wild plum trees or seedlings, to build your skills without risking your favourite trees.
- Keep a Notebook: Write down when you graft, what scion and rootstock you use, and how it turns out. This helps you learn what works in your garden.
- Join a Community: Look for local gardening groups or workshops in New Zealand, like those run by the Royal Horticultural Society of New Zealand or community gardens. You can also check X for Kiwi grafting tips or connect with groups like Fruit Tree Hub NZ.
Timeline and Activity Calendar
In New Zealand’s southern hemisphere seasons, grafting happens mainly in late winter to early spring (August to October), when trees are waking up but not fully growing. Here’s a simple calendar for your home orchard:
- Autumn (March–May): Choose and prepare rootstocks; collect scion wood from healthy trees.
- Winter (June–July): Store scion wood in a cool, moist place.
- Late Winter/Early Spring (August–October): Graft your trees when buds start to swell and sap flows.
- Spring/Summer (October–February): Check grafts, water regularly, and remove any flowers or fruit to help the graft grow strong.
- Year-Round: Keep tools clean, monitor tree health, and prune as needed.
Regional Tip: In North Canterbury, aim to graft in August–September for apples and pears, or July–August for cherries and plums, as they wake up earlier.
Preparing Rootstocks
Before grafting, you need a rootstock—the tree’s foundation. This could be:
- A young rootstock plant from a nursery (e.g., dwarf apple rootstocks like M9).
- A wild seedling growing in your area.
- A mature tree in your garden for adding new varieties.
Steps:
- Choose a healthy, compatible rootstock (see Compatibility section).
- For mature trees, prune back branches in autumn (March–May) to focus energy on the graft. Remove about one-third of the tree’s branches to avoid rejection of the scion.
- Keep the rootstock watered and healthy before grafting in late winter (August).
Sourcing Scions or Budwood
Scions are the bits of branch or bud you graft onto the rootstock. Here’s how to get them:
- From Friends or Neighbours: Ask local gardeners for cuttings from their favourite fruit trees.
- Online Exchanges: Check social media groups and forums.
- Nurseries: Buy scion wood from online retailers.
- Your Own Trees: Take cuttings from healthy trees in your garden.
When to Collect:
- Collect scion wood in winter (June–July) when trees are dormant.
- Choose vigorous, straight branches (about 30 cm long, pencil-thick) from last season’s growth.
- Avoid frozen, damaged, or diseased wood.
Storing Scion Wood
To keep scion wood fresh until grafting time:
- Wrap cuttings in damp paper towels and seal in a plastic bag.
- Store in a fridge at 4–7°C (not with apples or pears, as they release gases that can harm scions).
- Label each bundle with the variety and date (e.g., “Gala Apple, June 2025”).
- Check weekly to ensure the wood stays moist but not mouldy.
Tip: Use a spare fridge or a cool garage in New Zealand’s winter to keep scions dormant until August.
Grafting
Late winter to early spring (August–October) is grafting time in New Zealand, when trees start waking up and sap flows. Here’s how to do it:
- Choose Your Technique: Pick a method like whip grafting or cleft grafting (see Grafting Techniques).
- Prepare Scions: Cut scions to 10–15 cm, with 3–5 buds. Trim off the tip and base, as these buds are often weak.
- Make Clean Cuts: Use a sharp, sterilised knife to make smooth cuts for a tight fit.
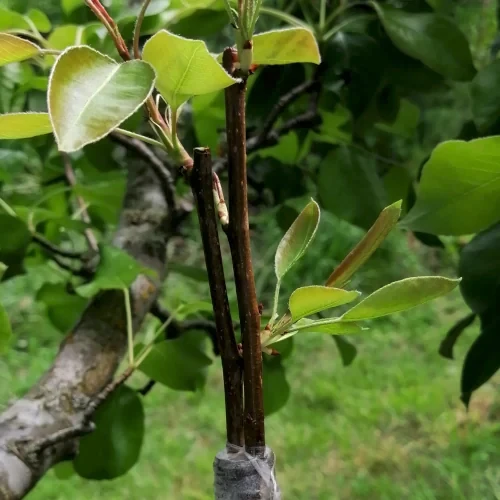
- Join Scion and Rootstock: Align the cambium layers (the green bit under the bark) for healing.
- Bind Tightly: Wrap with grafting tape or Buddy Tape to keep the graft secure and moist.
- Seal It: Apply grafting wax to protect the graft from drying out or germs.
- Label It: Mark the graft with the variety and date (e.g., “Granny Smith, 10 Aug 2025”).
- Positioning: Vertical grafts heal faster and are less likely to be knocked by birds or wind.
Order for Grafting:
- Cherries: Early August.
- Plums and Apricots: Mid-August to September.
- Apples and Pears: September to October.
Kiwi Tip: In windy areas like Canterbury, tie grafts extra securely and protect from spring gales with a stake or shelter.
Follow-Up and Maintenance
After grafting, your tree needs some TLC to thrive:
- Check Weekly: Within 1–2 weeks, healthy grafts show swelling buds. Failed grafts look brown and dry—remove them and try again next season.
- Remove Flowers/Fruit: For the first 2 years, pinch off any flowers or fruit to help the graft grow strong.
- Prune Smartly: On mature trees, trim back ungrafted branches to support the new scion.
- Remove Bindings: After 12 months, cut off non-biodegradable tape to avoid choking the tree.
- Control Rootstock Growth: Remove any shoots below the graft, as they’re from the rootstock and steal energy.
Kiwi Tip: Water grafted trees weekly in spring (October–November) to help them settle in New Zealand’s variable weather.
Compatibility
For a graft to work, the scion and rootstock must be close relatives (same species or genus). Here’s a guide for common New Zealand fruit trees:
- Apple:
- Rootstock: Grows 3–10 m, depending on type (e.g., M9 for dwarf, MM106 for semi-dwarf).
- Compatible Scions: Apples, medlar, quince, some European pears (e.g., ‘Conference’).
- Pear:
- Rootstock: Grows up to 13 m; quince rootstock for dwarf pears (4 m).
- Compatible Scions: European pears, some Asian pears, medlar (partially compatible).
- Note: Some pears (e.g., ‘Bartlett’) need an interstock like ‘Beurre Hardy’ for quince rootstocks.
- Stone Fruits (Peach, Plum, Apricot):
- Rootstock: Tolerates various soils; cherry plums handle wetter soils.
- Compatible Scions: Peaches, nectarines, plums, apricots, plumcots, ume. Some combinations (e.g., plum on peach) are short-lived.
- Cherry:
- Rootstock: Prefers well-drained soils.
- Compatible Scions: Sweet and sour cherries.
Grafting Techniques
There are lots of ways to graft, each suited to different trees or situations. Here are the basics for beginners:
Important Points
- Align the cambium layers (green under the bark) of scion and rootstock.
- Don’t graft upside down—check the bud direction!
- Use sharp, clean tools for smooth cuts.
- Work quickly to keep cuts from drying out.
- Wrap grafts tightly with tape but not so tight they choke.
- Graft in late winter/early spring (August–October).
- Use healthy, compatible scion wood with 3–5 buds.
- Vertical grafts grow stronger and faster.
Simple Common Grafts
- Whip Graft: Great for apples and pears when scion and rootstock are similar sizes (pencil-thick to 12 mm). Make a diagonal cut on both, add a small “tongue” to lock them together, align the cambium, and wrap tightly. Best in August–September before the bark slips.
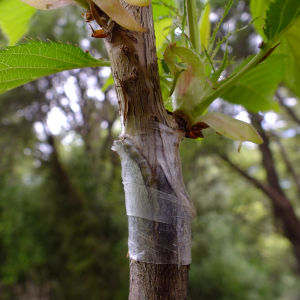
- Cleft Graft: Perfect for adding new varieties to larger branches (10–50 mm) on mature trees. Split the rootstock, insert two scions with sloped cuts, align the cambium, and seal with wax. Do this in August before buds fully swell.
Bud Grafting (Budding)
Take a single bud from the scion and slip it under the rootstock’s bark. Common for stone fruits like plums in late summer (January–February). Wrap tightly and check for growth in 2–3 weeks.
More Complex Multi-Grafts
Graft multiple scions onto one tree for different fruits (e.g., apples and pears). This saves space but can be tricky to manage, as varieties grow at different rates. Start with 2–3 varieties and prune regularly to balance growth.
Bridge Graft
Fixes damaged trees by grafting scions across a gap in the bark. Useful for repairing wind or animal damage in your orchard.
Kiwi Tip: Practice whip grafting first—it’s the easiest for beginners and works well for most New Zealand fruit trees.
Grafting for Specific Plants
Here’s how to graft popular New Zealand fruit trees:
- Apples: Use dwarf rootstocks like M9 for small gardens or MM106 for larger trees. Graft in September–October. Try varieties like ‘Gala’ or ‘Granny Smith’ for reliable fruit.
- Pears: Quince rootstocks make dwarf trees (4 m), but use an interstock for varieties like ‘Bartlett’. Graft in September–October.
- Stone Fruits (Plums, Peaches, Apricots): Use Myrobalan or ‘Golden Queen’ rootstocks for wetter soils. Graft in August–September. ‘Black Doris’ plums are a Kiwi favourite!
- Citrus: Common in warmer areas like Auckland. Use trifoliata rootstock for lemons or oranges and graft in late winter (August).
Common Mistakes to Avoid
- Misaligned Cambium: If the green layers don’t touch, the graft won’t heal. Double-check alignment before wrapping.
- Dull Tools: Jagged cuts stop grafts from joining properly. Sharpen your knife before starting.
- Wrong Timing: Grafting in summer (January–February) instead of late winter (August–October) often fails.
- Skipping Aftercare: Forgetting to water or protect grafts from pests can ruin your work.
Frequently Asked Questions (FAQ)
- Can I graft in summer? Late winter to early spring (August–October) is best for most grafts, but bud grafting works in late summer (January–February) for stone fruits.
- What if my graft fails? If the scion looks brown and dry after 2 weeks, remove it and try again next season with fresh wood.
- Do I need expensive tools? No! A sharp pocketknife, electrical tape, and a bit of wax are enough to start.
- Can I graft different fruits together? Only if they’re closely related, like apples and pears. Plums and cherries might work, but not apples and plums.
- Where can I learn more? Join a local gardening group, check X for Kiwi grafting tips, or visit workshops by Fruit Tree Hub NZ.